มีอะไรใหม่ใน Angular 9

Angular 9 มาพร้อม Rendering Engine ตัวใหม่ที่ชื่อว่า Ivy และมาพร้อมกับฟีเจอร์ที่น่าสนใจอีกมากมาย เรามาดูกันดีกว่าว่าใน Angular 9 มีอะไรที่น่าสนใจกันบ้างครับ
สารบัญ
- Ivy นั้นสำคัญไฉน
- Dependency Injection Scope ใหม่
- ยกเครื่อง CSS ใหม่
- Strict Template Type Checking
- ฟีเจอร์ใหม่ของ Angular CLI
- Component ใหม่
- Localization แบบใหม่
- TestBed.inject
- Component Harnesses
- TypeScript 3.7
- สรุป
Ivy นั้นสำคัญไฉน
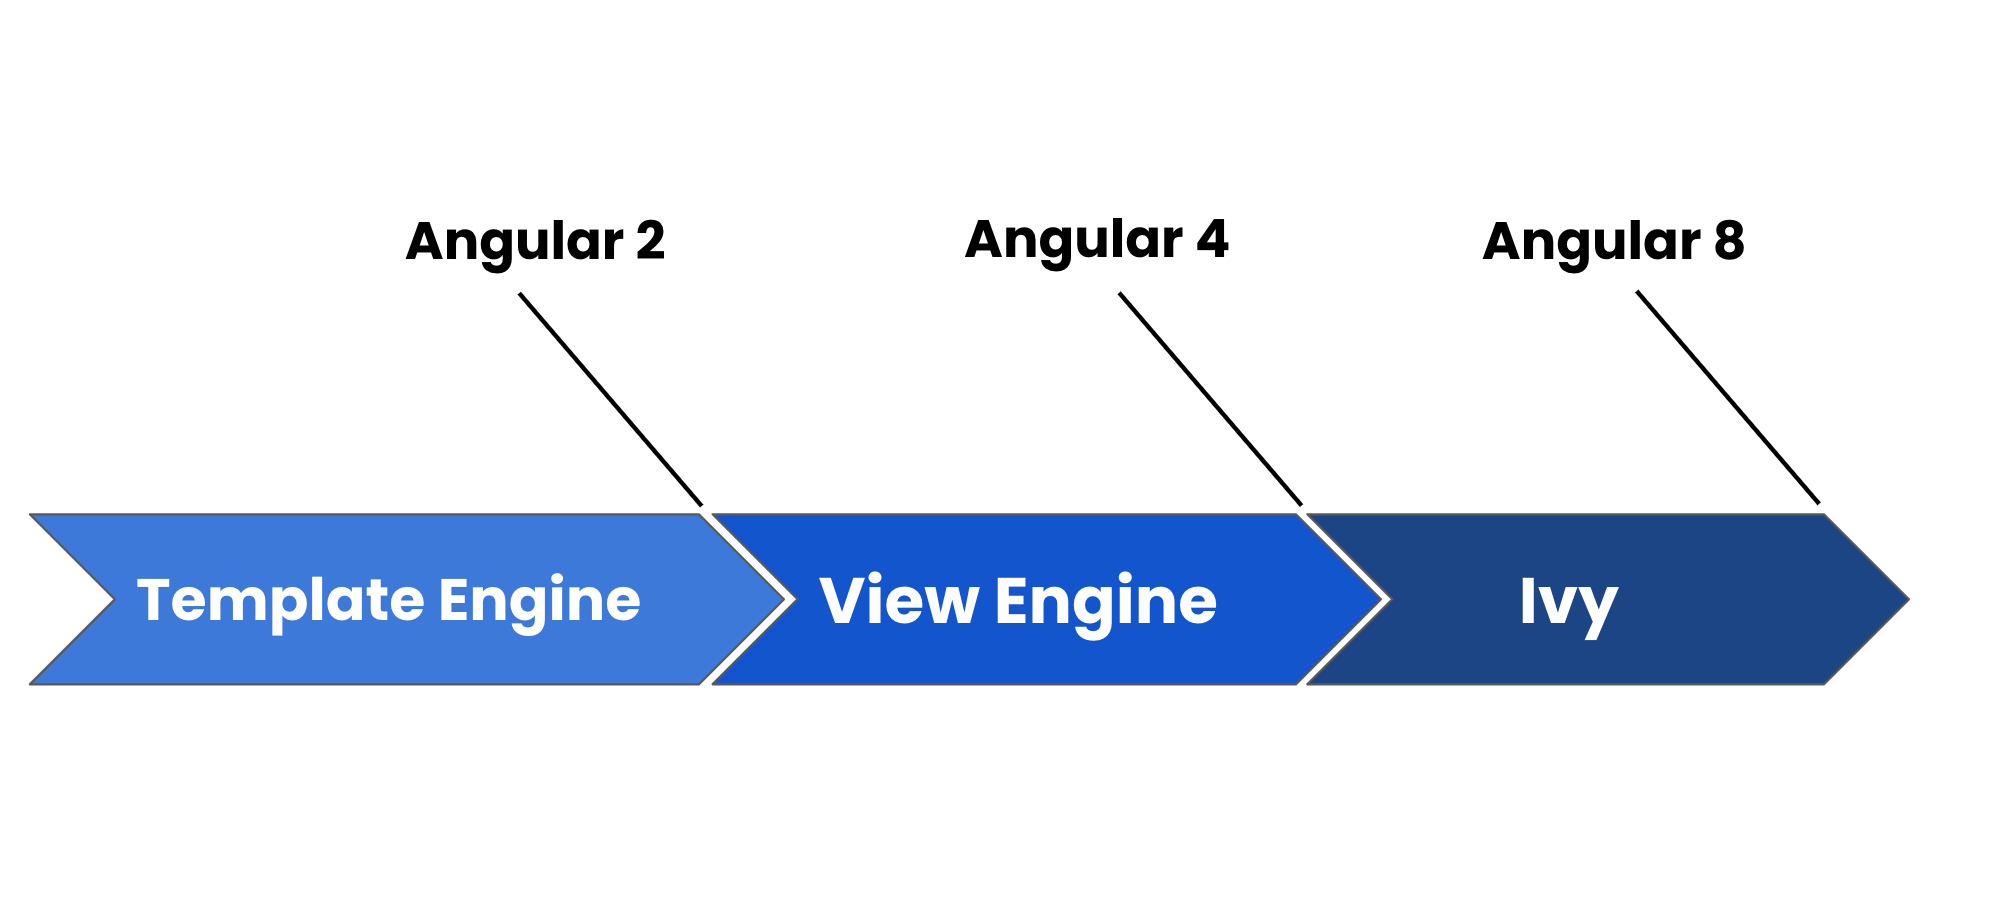
Angular นั้นมี Rendering Engine มาแล้วสองรุ่นนั่นคือ Template Engine และ View Engine ส่วน Ivy นั้นเป็น View Engine รุ่นล่าสุดซึ่งได้เปิดให้ลองใช้ตั้งแต่ Angular 8 แล้ว และมาถึง Angular 9 Ivy ก็ได้เป็น Default Rendering Engine อย่างเต็มตัว สำหรับใครที่ยังไม่รู้จัก Ivy ลองอ่านเพิ่มจากบทความด้านล่างได้เลยครับ
รู้จัก Ivy อนาคตใหม่ของชาว Angular _ก่อนจะเข้าสู่บทความ ขอเล่าถึงงานที่เพิ่งจบไปอย่าง Google I/O 2018 โดยในงานส่วนใหญ่จะเน้นไปที่ Android, Flutter, AI และ Machine Learning…_DevNotehttps://devnote.me/blog/introduce-ivy')[](https://devnote.me/blog/introduce-ivy)
ซึ่งการมาของ Ivy ทำให้มีผลดีต่อ Angular App ดังนี้
- ขนาดเล็กลง
- คอมไพล์ได้เร็วขึ้น
- เทสได้เร็วขึ้น
- Debug ง่ายขึ้น
- Error Message เข้าใจง่าย
ขนาดเล็กลง
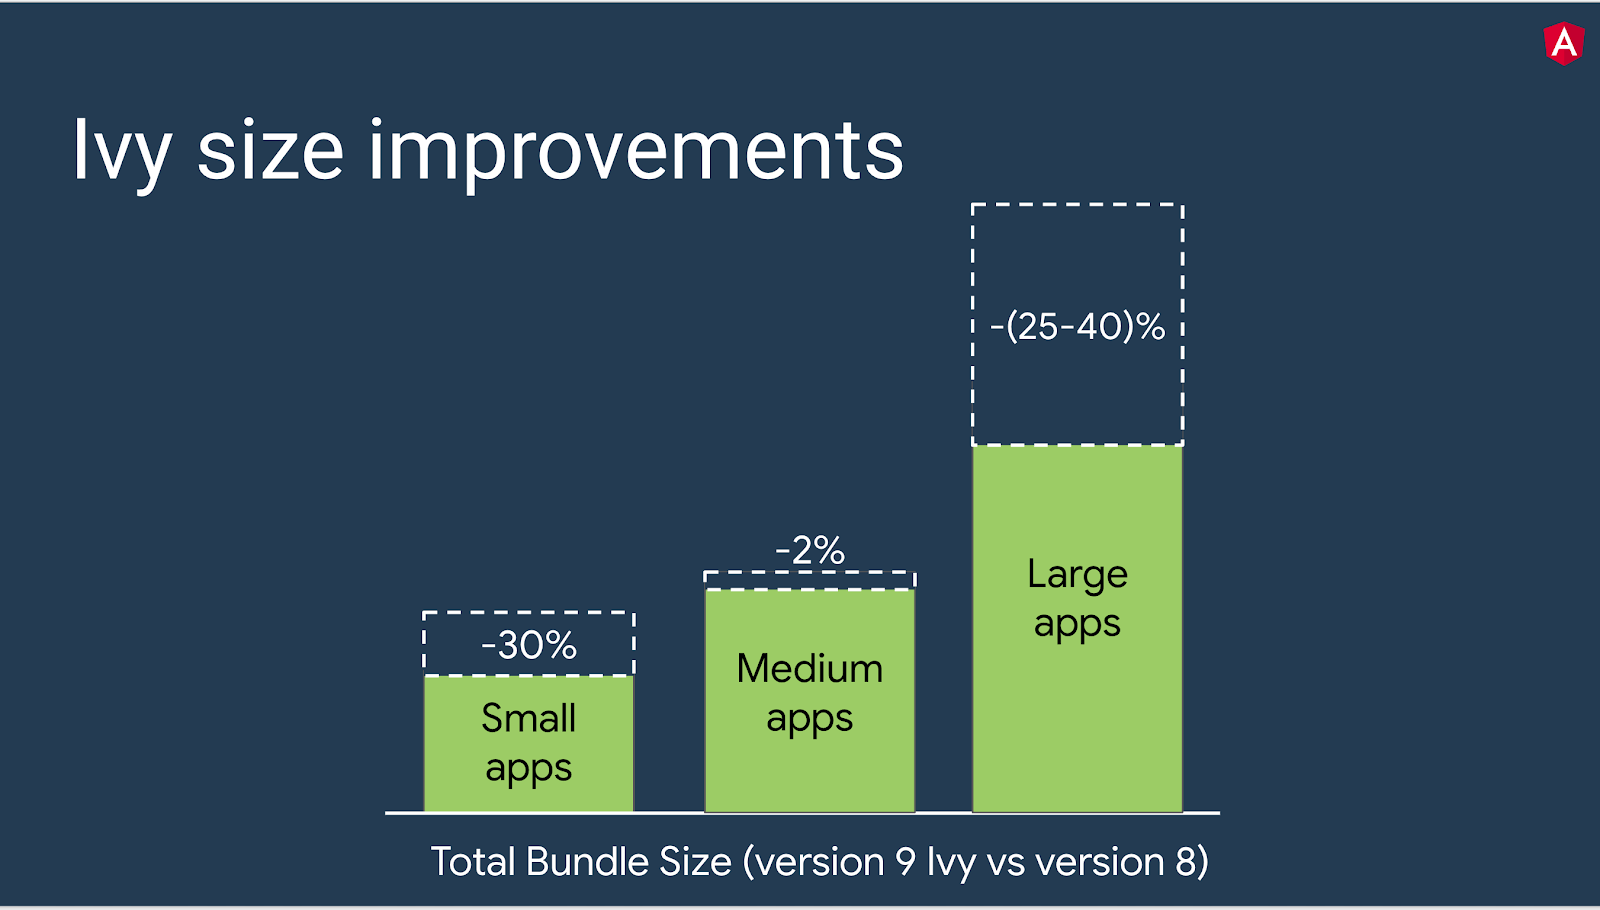
ดูจากรูปด้านบนที่ใช้ Angular 9(Ivy) เมื่อเทียบกับ Angular 8 จะเห็นได้ว่า App ที่มีขนาดเล็กและ App ที่มีขนาดใหญ่จะมี Bundle Size เล็กลง 25-40% เลยทีเดียว ส่วน App ขนาดกลาง Bundle Size จะลดลงเพียงเล็กน้อยเท่านั้น
คอมไพล์ได้เร็วขึ้น
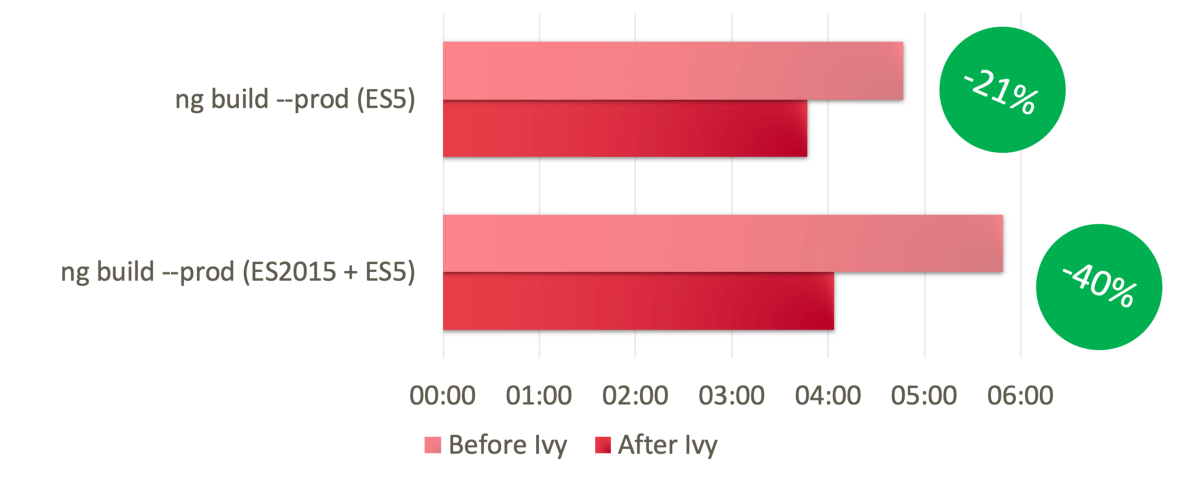
มีคนได้ลองทำการทดสอบการคอมไพล์ระหว่างการใช้ Ivy และไม่ใช้ Ivy พบว่า Production build เร็วขึ้น 20-30%
ส่วน Development build เร็วขึ้น 20-30% ครับ
สำหรับใครอยากดูผลการทดสอบ Ivy Build Performance แบบละเอียดๆ ดูได้จากลิ้งค์ด้านล่างนี้ได้เลย
Angular with Ivy - Build performance review We’re going to dive into bundle-size and compilation speed insights. Was Ivy project worth waiting for?https://indepth.dev/angular-with-ivy-build-performance-review/')[](https://indepth.dev/angular-with-ivy-build-performance-review/)
รันเทสได้เร็วขึ้น
ก่อน Angular 9 เวลารันเทส TestBed จะทำการรีคอมไพล์ Component ใหม่ทุกครั้งระหว่างรันเทสโดยไม่สนว่าจะมีการเปลี่ยนแปลงที่ Component (เช่นถูก override) หรือไม่ แต่ใน Ivy TestBed จะทำการรีคอมไพล์เฉพาะเมื่อ Component มีการเปลี่ยนแปลงครับ ส่งผลให้สามารถรันเทสได้เร็วขึ้น 40-50% เลยทีเดียว
Debug ง่ายขึ้น
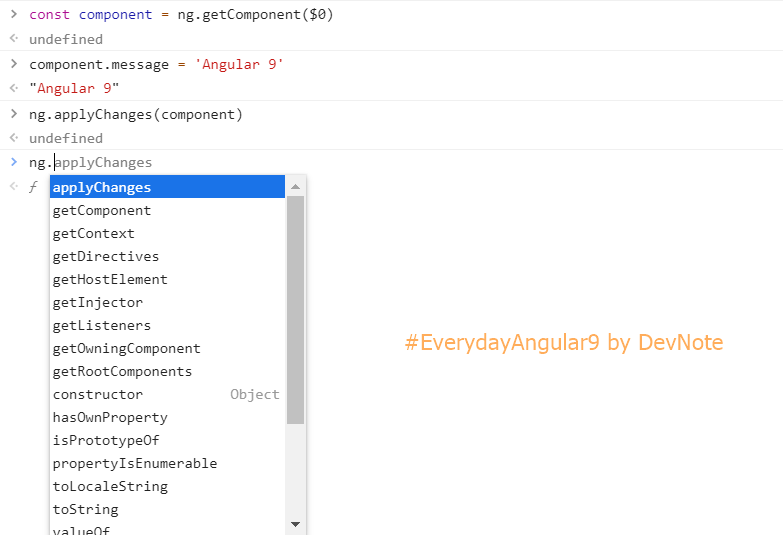
ใน Angular 9 ถ้าเราอยู่ใน Dev Mode และเปิด Devtool Console ขึ้นมา เราสามารถเรียกใช้ ng object เพื่อทำอะไรบางอย่างกับ Angular Component ใน Devtool Console ได้ครับ
ยกตัวอย่างเช่น เราสามารถเรียกใช้ Reference ของ Component ที่เลือกอยู่ใน Devtool Console โดยใช้คำสั่ง ng.getComponent($0) โดยที่ $0 คือ Component ที่เลือกอยู่ พอเราได้ Reference ของ Component มาแล้วก็สามารถเปลี่ยนค่า Input ของ Component นั้นได้ครับ
พอเราเปลี่ยนค่าจนพอใจแล้วถ้าอยากให้ค่าที่เปลี่ยนมีผลกับ Component นั้นให้ใช้คำสั่ง ng.applyChanges
นอกจากนี้ยังมีคำสั่งอื่นให้เรียกใช้มากมาย ดูตัวอย่างจากในรูปได้เลยครับ
Error Message เข้าใจง่าย
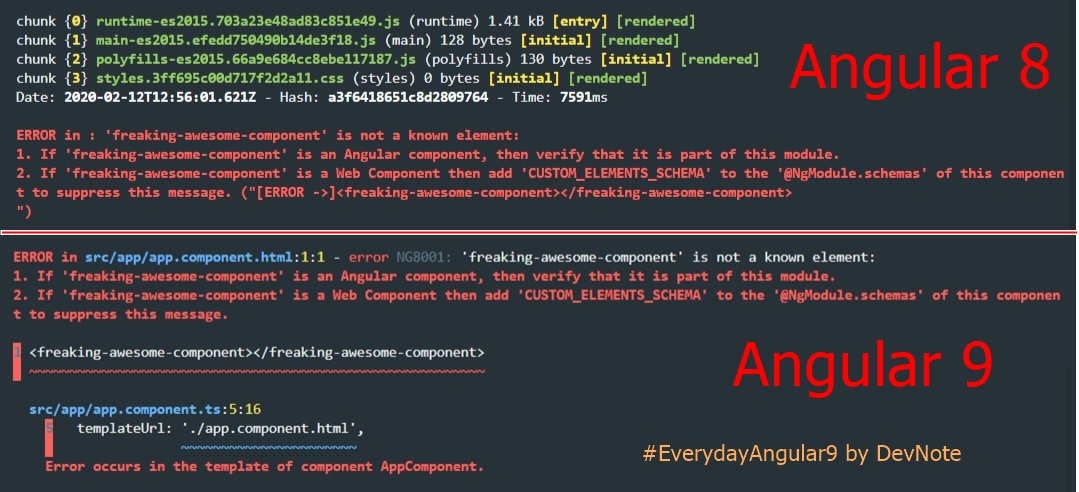
จากรูปด้านบนจะเห็นได้ว่า Error Message ใน Angular 9 ดูเข้าใจง่ายมากกว่าใน Angular 8 เยอะเลยครับ
ต่อไปเรามาไล่ดูฟีเจอร์ใหม่ที่มากับ Angular 9 ไปทีละอย่างกันเลยครับ
Dependency Injection Scope ใหม่
เริ่มด้วยฟีเจอร์ใหม่อันแรกเลยใน Angular 9 จะมีทางเลือกให้ใส่ providedIn เวลาสร้าง service ที่นอกจาก root ละครับ โดยจะมี scope ที่เพิ่มมาคือ any และ platform ลองดูตัวอย่างในโค้ดด้านล่างนี้ได้เลยครับ
import { Injectable } from '@angular/core'

// provide service ใน root
// injector (Application Level)
@Injectable({
  providedIn: 'root',
})
export class SomeService {}

// provide service ใน root injector
// (Module ที่ไม่ใช่ Lazy Load) และ
// provide ใน Module (Lazy Load
// Module) ทำให้ได้ instance ทุกๆ
// Lazy Load Module
@Injectable({
  providedIn: 'any',
})
export class AnotherService {}

// provide service ใน platform injector
// ซึ่งจะถูกแชร์กับทุก App ใน Platform เดียวกัน
// เช่น Angular Elements ที่อยู่ในหน้าเดียวกัน
@Injectable({
  providedIn: 'platform',
})
export class JustAnotherService {}
ยกเครื่อง CSS ใหม่
Styling Precedence
ใน Angular 9 มีการปรับปรุงเรื่อง CSS Class และ Style binding
โดยก่อน Angular 9 ถ้ามีการ Binding Class หรือ Style ตัวเดียวกัน Style ตัวที่โดน binding หลังสุดจะ override Style ตัวที่โดน apply ก่อนหน้าครับ
ซึ่งกระบวนการแบบนี้คาดเดาไม่ได้เท่าไหร่ ใน Angular 9 เลยเพิ่ม Styling Precedence ขึ้นมาโดยจะเรียงลำดับความสำคัญจากสูงไปต่ำดังนี้
Template binding > Directive host binding > Component host binding
Class/Style binding ที่มีความเจาะจงกว่าก็จะมีความสำคัญสูงกว่า ส่วน Class/Style ที่เป็น static จะมีความสำคัญต่ำสุดครับ
นอกจากนั้นแล้วเรายังสามารถ Delegate style เพื่อให้ไปใช้ตัวที่มีลำดับความสำคัญต่ำกว่าได้โดยทำการเซ็ตค่าให้เป็น undefined
แต่ถ้าอยากเอา Style นั้นออกไปเลย ให้เซ็ต Style binding นั้นเป็น null แทน
ดูตัวอย่างเรื่อง Styling Precedence ในโค้ดด้านล่างได้เลยครับ
<!-- class.special เป็น Template binding จะ override dirWithClassBinding -->
<div [class.special]="isSpecial" dirWithClassBinding>Some text.</div>

<!-- ถ้า styleExpr มีค่าจะ override style="color: blue" ที่เป็น static -->
<div style="color: blue" [style]="styleExpr">Some text.</div>

<!-- ถ้า classExpr เป็น undefined จะ delegate class binding ไปที่ class="special" แทน -->
<div class="special" [class]="classExpr">Some text.</div>

<!-- ถ้า styleExpr เป็น null style.color จะถูกเอาออกไป -->
<div [style.color]="styleExpr">Some text.</div>
ส่วนถ้าใครอยากศึกษาเรื่อง Styling Precedence เพิ่มเติม ดูต่อในลิ้งค์ด้านล่างนี้ได้เลย
ซัพพอร์ต CSS Customer Property
CSS Custom Property คืออะไร?
CSS Custom Property หรือ CSS Variable ก็คือตัวแปรใน CSS นั่นเอง ทำให้เราสามารถใช้ตัวแปรใน CSS ได้โดยไม่ต้องใช้ Preprocessor อย่างพวก LESS หรือ SASS
ผลจากการทำ Style Refactoring ของทีม Angular ทำให้ใน Angular 9 สามารถ binding ค่ากับ CSS Custom Property ได้แล้วแบบนี้
<div [style.--main-border-color]=" '#CCC' ">
  <p style="border: 1px solid var(--main-border-color)">hi</p>
</div>
Strict Template Type Checking
ใน Angular 9 มีโหมด Template Type Check แบบใหม่ที่ชื่อว่า Strict mode โดยเราสามารถเปิด Strict mode ได้โดยใส่ flag ในไฟล์ tsconfig.json แบบนี้
{
  ...
  "angularCompilerOptions": {
    "fullTemplateTypeCheck": true,
    "strictTemplates": true
  }
}
โดยใน Strict mode Angular จะเช็ค type ใน template ได้ดีขึ้น ไม่ว่าจะเป็นเช็ค type ของ Input ของ Component, Infer type ของ Component/Directive, Infer type ใน embedded view(*ngIf, *ngFor, ng-template) ได้ถูกต้อง, Infer type ของ event ได้ถูกต้อง
<!-- ใน Strict mode สามารถเช็ค type ของ message ได้ -->
<app-hello [message]="'Hello'"></app-hello>

<!-- ใน Strict mode ยังเช็ค type ของ user ที่อยู่ใน *ngFor -->
<!-- รวมทั้งเช็ค type ของ property address และ city ได้ด้วย -->
<div *ngFor="let user of users">
  <h2>{{ config.title }}</h2>
  <span>City: {{ user.address.city }}</span>
</div>
ดูรายละเอียดเพิ่มเติมเรื่อง Template type checking ได้ที่ลิ้งค์นี้เลยครับ
ฟีเจอร์ใหม่ของ Angular CLI
ใน Angular 9 ได้เพิ่มความสามารถของ Angular CLI มามากมาย ไปดูกันเลยดีกว่าว่ามีอะไรบ้างครับ
- สร้าง Interceptor
$ ng generate interceptor auth- สร้าง Component แบบ Container
$ ng generate component --type container hello- สร้าง Guard ที่ implement CanDeactivate
$ ng generate guard auth --implements=CanDeactivate- อัพเดท Angular พร้อมสร้าง commit
$ ng update --createCommits- build ด้วย configuration หลายตัว
$ ng build --configuration=production,thai- สร้าง project ใหม่ด้วย strict TypeScript config
$ ng new project-name --strictComponent ใหม่
Youtube Component
Install โดยใช้คำสั่ง
npm install @angular/youtube-playerวิธีใช้
// example-module.ts
import { NgModule } from '@angular/core'
import { YouTubePlayerModule } from '@angular/youtube-player'

@NgModule({
  imports: [YouTubePlayerModule],
  declarations: [YoutubePlayerExample],
})
export class YoutubePlayerExampleModule {}

// example-component.ts
@Component({
  template: '<youtube-player videoId="vRXZj0DzXIA"></youtube-player>',
  selector: 'youtube-player-example',
})
class YoutubePlayerExample implements OnInit {
  ngOnInit() {
    const tag = document.createElement('script')

    tag.src = 'https://www.youtube.com/iframe_api'
    document.body.appendChild(tag)
  }
}
Google Map Component
Install โดยใช้คำสั่ง
npm install @angular/google-mapsจากนั้นโหลด Google Map JavaScript API แบบนี้
<!-- index.html -->
<!DOCTYPE html>
<head>
  ...
  <script src="https://maps.googleapis.com/maps/api/js?key=YOUR_API_KEY"></script>
</head>
หรือเราจะ Lazy Load API โดยใช้ HttpClient jsonp เพื่อรอให้ API โหลดเสร็จแล้วค่อยโชว์ Google Map Component แบบนี้
// google-maps-demo.module.ts

import { NgModule } from '@angular/core'
import { GoogleMapsModule } from '@angular/google-maps'
import { CommonModule } from '@angular/common'
import { HttpClientModule, HttpClientJsonpModule } from '@angular/common/http'

import { GoogleMapsDemoComponent } from './google-maps-demo.component'

@NgModule({
  declarations: [GoogleMapsDemoComponent],
  imports: [CommonModule, GoogleMapsModule, HttpClientModule, HttpClientJsonpModule],
  exports: [GoogleMapsDemoComponent],
})
export class GoogleMapsDemoModule {}

// google-maps-demo.component.ts

import { Component } from '@angular/core'
import { HttpClient } from '@angular/common/http'
import { Observable, of } from 'rxjs'
import { catchError, map } from 'rxjs/operators'

@Component({
  selector: 'google-maps-demo',
  templateUrl: './google-maps-demo.component.html',
})
export class GoogleMapsDemoComponent {
  apiLoaded: Observable<boolean>

  constructor(httpClient: HttpClient) {
    this.apiLoaded = httpClient.jsonp('https://maps.googleapis.com/maps/api/js?key=YOUR_KEY_HERE', 'callback').pipe(
      map(() => true),
      catchError(() => of(false))
    )
  }
}
<!-- google-maps-demo.component.html -->
<div *ngIf="apiLoaded | async">
<google-map></google-map>
</div>วิธีใช้ Google Map Component เราสามารถใส่ Option ผ่าน Input ได้แบบนี้
<google-map [options]="options"></google-map>options: google.maps.MapOptions = {
center: { lat: 40, lng: -20 },
zoom: 4,
}หรือจะแยกกันเป็นคนละ Input แบบนี้เลยก็ได้ครับ
<google-map [center]="center" [zoom]="zoom"></google-map>center: google.maps.LatLngLiteral = { lat: 40, lng: -20 }
zoom = 4Localization แบบใหม่
Angular 9 มาพร้อมกับการซัพพอร์ต i18n ซึ่งเป็นการยกเครื่องใหม่ โดยมาพร้อมกับ Package ใหม่ที่มีชื่อว่า @angular/localize สามารถ install ด้วยคำสั่ง
ng add @angular/localizeซึ่ง i18n ใน Angular 9 สามารถ Tree Shaking ออกไปได้ด้วยถ้าเราไม่ได้ใช้งาน
นอกจากนั้นแล้วยังสามารถทำ Dynamic Loading Translation และซัพพอร์ตการทำ Translation ในไฟล์ Component ด้วย
ทีม Angular ยังบอกอีกว่าด้วยกระบวนการ build แบบใหม่ทำให้ลดเวลาในการ build ถึง 10 เท่าเลยทีเดียว
อ่านเพิ่มเติมเรื่อง i18n ใน Angular 9 ได้ในลิ้งค์นี้เลยครับ
TestBed.inject
ใน Angular 9 TestBed.get ถูก deprecate แล้วเพราะไม่เป็น Type Safe (return type เป็น any)
ใน Angular 9 เลยมีตัวใหม่มาแทนคือ TestBed.inject ที่ทำหน้าที่เหมือน TestBed.get ทุกอย่างแต่เป็น version ที่ Type Safe ครับ
// ก่อน Angular 9 ต้อง cast type แบบนี้
const service = TestBed.get(MyService) as MyService

// Angular 9 ไม่ต้อง cast type แล้ว
const service = TestBed.inject(MyService)
Component Harnesses
Angular 9 มาพร้อมกับ Concept Test แบบใหม่ที่เรียกว่า Component Harness ซึ่งเอาแนวคิดมาจาก PageObject Pattern ครับ
ซึ่งการ Test ด้วย Component Harness นี้จะเป็นการ Test ที่ไม่ยุ่งกับ Implementation Detail ทำให้ Test มีความ Robust กว่าและยังอ่านง่ายกว่า Test แบบปกติด้วยครับ
ตัวอย่าง Test แบบ Component Harness
it('should switch to bug report template', async () => {
  expect(fixture.debugElement.query('bug-report-form')).toBeNull()
  const select = await loader.getHarness(MatSelect)
  await select.clickOptions({ text: 'Bug' })
  expect(fixture.debugElement.query('bug-report-form')).not.toBeNull()
})
Angular Material Component ส่วนใหญ่จะสามารถเทสด้วย Component Harness ได้แล้ว
และ Component Harness จะถูกเป็นส่วนหนึ่งของ Angular CDK ด้วย
อ่านเรื่อง Component Harness เพิ่มเติมได้ที่ลิ้งค์ด้านล่างได้เลย
TypeScript 3.7
Angular 9 มาพร้อมกับการซัพพอร์ต TypeScript 3.7 ซึ่งมีฟีเจอร์อันแสนสะดวกอย่าง Optional Chaining และ Nullish Coalescing ครับ
// ก่อนมี Optional Chaining
if (foo && foo.bar && foo.bar.baz) {
  // ...
}

// ใช้ Optional Chaining
if (foo?.bar?.baz) {
  // ...
}

// Nullish Coalescing ใช้จัดการกับ null และ undefined เท่านั้น
// ไม่มีผลกับ Falsy Value
let x = foo ?? bar()
สรุป
Angular 9 มาพร้อมกับ Rendering Engine ตัวใหม่ที่ชื่อว่า Ivy ซึ่งการมาของ Ivy ทำให้เกิดผลดีหลายอย่างเช่น App มีขนาดเล็กลง, คอมไพล์และเทสได้เร็วขึ้น, Debug ง่ายขึ้น, Error Message เข้าใจง่ายขึ้น
นอกจาก Ivy แล้วยังมีฟีเจอร์ใหม่ๆอีกมากมายเช่น Dependency Injection Scope ใหม่, ยกเครื่อง CSS ใหม่, Strict Template Type Checking, Angular CLI ที่มาพร้อมคำสั่งใหม่ๆ, Youtube Component และ Google Map Component, Localization แบบใหม่, TestBed.inject, Test ด้วย Component Harnesses และยังซัพพอร์ต TypeScript 3.7 ที่มีฟีเจอร์อย่าง Optional Chaining และ Nullish Coalescing ครับ